Making

Pasta la Vista, baby!

Carbs are big in our household, as anyone who knows us will attest. Given that my husband declares the potato to be his favourite vegetable, and I would request a toasting fork and crusty loaf if given notice of being stranded on a desert island, it was inevitable that Harry was going to feel a strong gravitational pull towards all things starchy. Whilst I’m secretly proud of the fact that he freely eats vegetables and would for ages misidentify any tree in a picture book as being ‘a piece of broccoli’ (no idea why; it’s unlikely, frankly, that he made this connection at home…), it’s also true that if you ask him what he’d like to do next, the statistically most probable answer at any given time is ‘eat spaghetti’.

So this weekend we whipped out our shiny new pasta machine that was the gift-of-the-year in Christmas 2010, rather like the bread machines that everyone gave and received 10yrs earlier.  A guilty confession; our machine is actually a present I bought for someone else and decided to keep because it looked so enticing; instead, they received a selection of novels and I no doubt received a great dollop of bad karma that will ensure all the pasta I make with it is cursed.  We’ll soon find out.  My cookbooks and the web are full of delicious recipes for homemade pasta involving herbs, different flours and semolina, et al, but we plumped for the simplest possible concoction (below), and got stuck in.  As you can see, this is one of those cookfests where it’s all about the journey, not the end result…

Take your 3 ingredients, create a volcano-like pile of the salted flour on your worktop, and pour the lightly beaten egg mixture into the middle.  Watch as the flour sides collapse and spend several minutes chasing egg around the table (you can see why small boys love this bit).

Mix the ingredients together.  Taste periodically if you really can’t resist.  Try not to touch anything else at all.  Once  a dough forms, knead for about 10 minutes.  Abandon your mother after 2 minutes and find something more interesting to do instead.  Do this quietly, dragging your sticky hands along the wall as you amble towards the toy box.

Hard work done, leave the dough to settle.

Roll out with a rolling pin until about 1cm thick, and then start to feed it through your pasta machine.  Of course, it’s perfectly possible to do this with a rolling pin alone and a lot of elbow grease and persistence.

Once you’ve got a long, thin piece of dough about 3mm thick, feed it through the slicer bit to create your chosen shape; we opted for tagliatelle, and draped it over a (clean!) broom handle to keep the strands separate whilst we worked on the rest of the dough.  As you can see, this offered an impossible temptation for a 2yr old and his fire engine, so our pasta curtain took a bit of a beating at this point.

Once you’ve finished making the tagliatelle, curl each strand into a loose ball and save till you’re ready to cook (the sooner the better).  We tossed ours gaily into a pan of boiling water and hastily gathered spoons, napkins and a large bowl each before stirring in some tomato sauce and basil. And you know, here’s the thing; despite starting with gusto (note the two forks used for speed, below), Harry quickly slowed to a halt and carefully extracted a piece of rubbery, part-chewed pasta from his mouth, then paused and asked oh-so-casually; ‘Maybe we can have Cheerios for tea instead, mummy?’ .  Karma. I knew it…

A Moment in Time…

At 2 and a quarter, Harry finds it utterly incomprehensible that he was once a baby. ‘You soooooo funny, Mummy!’ he chortles, with patronising affection,when I venture to suggest that he was once small enough to fit in a Moses basket and slept for 20hrs a day.  The notion that he once came from inside my tummy is met with stunned incredulity.  I pretend that this is because my stomach is so flat it seems impossible, but this hypothesis in turn causes my husband to giggle with incredulity so I swiftly move on.

Anyway, I digress; the thing is that at some point between about 6 and 9, (esteemed studies show), children are at their most intensely interested in stories about how they used to be and what they did, said and liked to do. I anticipate this phase with mild trepidation because my memory is very unreliable and I know I will fall short when it comes to detail, despite the vividness with which I feel I’m storing the memories away now.  So today, Harry and I built a Time Capsule to be hidden in the loft and ‘discovered’ again some wet Sunday when he is about 8yrs old.  Packed with photos and information about exactly who Harry is today, it should prove interesting, especially as it contains some challenges and a few pieces of treasure as well.  It does, of course, depend on his father and I remembering that it’s up there, but hey, we can at least hope…

Here’s a selection of the stuff that Harry and I put inside….the possibilities are endless.

1. A list of all the things he loves the most right now; foods, friends, toys and games

2.  A load of shredded tissue (gotta have something to throw around..)

3. His favourite toy character, at Harry’s insistence (don’t worry, we have another one….)

4. The current brochure and newsletter from the school he’ll eventually go to at 5yrs old, so he can see what all the teachers looked like back in 2012
5. A picture of us – though with some hesitation as I know this will provoke a later critique along the lines of ‘Dad, where did all your hair go? Mummy, what were you wearing??’
6. Footprints and handprints to compare and contrast with then and now
7. A note of his current height, and a challenge to find the marker of this that is shown in the photo (a small carving on a tree in our garden), and to make a new one…

8. And best of all, treasure: a small, corked glass bottle with clues as to where to find £20 of his 2011 Christmas money, which I’ve hidden somewhere in the house… I’m just hoping he works out the clues because I’m sure I’ll have forgotten…

Champagne on Ice, Dinner at 8…

Some friends you just know are going to be in your lives for the long run, and our former neighbours fall firmly into that category. In the space of just a couple of years we’ve camped out in each others’ kitchens, set the world to rights more times than I care to remember,  celebrated some of life’s great milestones and donned a myriad of fancy dress costumes whilst sinking an inordinate number of bottles of wine – all the usual stuff that bonds you and transcends the superficial differences in age and life stage.  So it was a no brainer that they’d be the first people invited to dinner the moment the new cooker was connected, and last weekend we celebrated in style.

Of course, anyone who has ever had a new kitchen fitted will immediately recognise my amateur error above, namely to throw a dinner party without having even idly flicked through the 368 page cooker manual beforehand, and indeed such a laissez-faire attitude was foolhardy to say the least. The food was certainly eye-watering, but not alas because of its grandeur and finesse but because of the smoke which billowed from the oven and created an atmospheric if throat-constricting backdrop to the evening.

Still, the champagne helped, and the table decor distracted – I made these personalised placemats earlier in the day using a basic graphics programme and some vintage cutlery clipart, before adding a touch of silver leaf to the knife and fork to catch the light from the candles on the table.  Stencilling the initials of our friends on these slate tags below with a chalk pen made for unique (and wipe-clean) napkin rings, into which I tucked a sprig of rosemary for a flash of colour and a hint of barely discernible scent. Tips and techniques below…


For the placemats (I used Powerpoint, but adapt these guidelines for your chosen programme)….

  • Draw a simple coloured square for your background colour, and choose font colour
  • I googled an online dictionary and copied the phonetic layout and invented appropriate descriptors for each guest
  • Either paste your clip-art directly onto the backdrop or carefully print, clip and paste on to each
  • I printed these onto UK A3 sized paper – using recycled paper gave a great matte finish, but normal copy paper would work fine
  • Rub the clip-art image lightly with low-tack glue (I used Pritt-Stick) and brush on a little silver leaf, using a dry brush to remove any excess.
  • Save the template – you can use it infinitely and just change names and descriptors each time – ta da!


Channeling Martha with a spot of dip ‘n dye

I was lying on the sofa the other day, idly trying to choose which of the few remaining chocolate Mini Eggs to eat first; should it be the pastel pink one, or the soft purpley-blue one? (Note the deliberate use of ‘first’ here; it was clearly never going to be a trade-off).  It reminded me that Easter is just around the corner and that Martha Stewart is no doubt at this very moment engaged in vigorous preparations for her extensive annual Easter home-makeover.  I prefer a rather more minimalist approach myself, saving the creative double-barrels for Christmas, but the one thing I do love doing is dip-dyeing eggs to make a simple centrepiece, or even a colourful addition to picnics when the weather allows.

The one big drawback here in the UK is the distinct lack of white eggs, unlike in the US where white eggs are the norm.  Apparently sometime back in the 60s, the UK government announced that brown eggs are better for you, and farmers and the general public immediately switched allegiance and the white hen egg was quite literally bred out of circulation.  The health-benefits story turned out to be entirely untrue, but brown eggs are now the norm and so for this I used white duck eggs, from Prince Charles’s very own Royal farms, and thus retailing at about £10 an egg.  Alright then, £2 a box.  Even so…

1. Hard-boil your eggs, boiling rapidly for 5mins then cooling gently in the pan for 15 mins to ensure a gradual reduction of heat, preventing the shells from cracking.  In the meantime….

2. Prepare several small bowls with 1 tbsp vinegar, food colouring of your choice and enough warm water to cover the egg completely. I used plain blue and green (above), then also mixed pink and blue food colouring to create a lavender colour, and experimented with different shades and depths of colour as I went along.

3. Add the eggs in turn and check colour regularly – leave for anything from 30 seconds to 5 minutes for deep colour, before extracting with gloves or tongs. Don’t wipe the eggs but instead rest of a piece of kitchen roll or place in egg cups.  Martha’s minimum wage elves apparently build her custom-made draining boards with a grid of nails specifically calibrated for optimal egg drying, but for us mere mortals an egg cup is more than sufficient.

4. The eggs look beautiful just grouped on a tonal plate as below (this one is from Wedgwood’s Vera Wang ‘Chalk’ range and I use it constantly…), or you can experiment with speckle effects using either undiluted food colour (if you’re intending to eat the eggs) or artist’s ink or paint if not.  Be warned that using anything pink/red based could leave your kitchen looking like a scene from CSI, with extensive blood spatter pattern effects across every surface.

The good thing is, once you’ve finished displaying them (no longer than a week after cooking, and keep in the fridge in the meantime), they taste really lovely too, despite H’s obvious suspicion…

Spiders, leaky roofs and that cheese obsession again…

This week’s project: a slate cheese board made from one of the ancient roof tiles which I found tucked away in the shed at the bottom of the garden.  This shed, which looks as if it would fall down if someone so much as coughed loudly in its presence, contains a myriad of dusty and (to me) beautiful abandoned garden bits and bobs left by previous owners.  A mountain of tiny, hand-formed terracotta plant pots are ready to be transformed into summer candles (on my long list of things to do…), but it was the slate tiles that caught my eye this time.

Taking the filthy and unpromising specimens below, the first step was to give each a long, hard scrub before coating with a durable matt varnish to bring out the original depth of colour.  Actually, I’ve abbreviated the process somewhat; the first step was to pick up a slate tile, carry it halfway in doors before dropping it, shrieking, onto the lawn as a generation of arachnids large and small leapt off the tile and scurried hastily back to the security of the shed. Having recovered from the mild hysteria this provoked, I carefully checked that no-one had observed me before casually retrieving the tile and continuing with the stages described above.

I used two cupboard handles shaped like chillies to attach to either end for carrying – I’d found these a year ago in a sale bin at the local DIY store and finally they’ve found a natural home.  I used epoxy resin to attach them securely, though those more savvy with drill-bits might want to have a go at doing this properly and making holes in the slate itself; mine looked a bit fragile to take it.  Now for the fun bit of accessorising the new cheeseboard; these decorative parchment leaves look great against the black, and a simple white pastel pencil works well on the slate, and is erased with one wipe of a wet cloth.  I’ll also be using it for tapas, with perhaps a trio of white bowls for contrast.

This project would be even easier with new slate tiles if you happen to come across them or have neighbours who are in the process of repairing their roof; a word of caution however – it was only when I whipped this out at dinner with much fanfare and self-congratulation that I noticed my husband peering at it a bit too closely. ‘Would that be one of the handful of original tiles I’d set aside to repair the annexe roof?’ he queried, in the kind of voice that tells you we both know the answer already.  Oops. So check that the roof slate is spare before coming over all artistic, would be my advice.  Still, it looks great

Spring Fever

After a couple of stuttering false starts, it’s clear that Spring is just around the corner and Harry and I are alternating between indoors and outdoors at the drop of a hat.  Thank heaven for wipe-clean wood flooring. When the sap is rising and the buds are bursting into colour, it makes me come over all green-fingered, so this week we’ve been experimenting with growing cress, the ultimate in instant-gratification gardening.  There’s something so bafflingly magical about being able to toss a generous and unfettered handful of seeds onto some damp cotton wool and see them sprout forth overnight. For those with patchy childhood memories, each stage is demonstrated with gusto by Harry, below. Our admittedly rather camp collection of Cressmen are now 5 days old and ready for a first trim…


Step 1: moisten some cotton wool in lukewarm water

Step 2: Insert carefully into your egg cup.  Pause to wipe hands on your jumper.

Step 3: Scatter a small handful of seeds carefully into the cup, covering the cotton wool

Step 4: Abandon this plan; instead, scatter seeds flamboyantly over all surfaces

Step 5: Your work is complete. Retire for a nap whilst Mummy clears up and entertains herself attaching eyes and moustaches to your efforts, in homage to The Village People.

And then… For something a little more grown-up, and to give the impression that great culinary endeavours occur in my kitchen, I also planted up a few wilting supermarket herbs into a variety of different decorative containers (including a copper coffee tin, right), and am diligently watering, trimming and tossing into any dish which may warrant additional greenery… aesthetics may outweigh flavour here, but at least they look pretty. Maybe a little understated compared to the Cressmen, but then there’s only so many things you can attach fake eyes to…

Lepidoptery for the Lily-Livered

As a child on holiday in Cornwall, I remember scuffing my way along the hedgerows in Summer and finding seemingly hundreds of butterflies which had quietly met their last and were now decoratively, if a little sombrely, adding a flash of colour amidst the green.  We’d gather them up and head home, carefully cupping our deceased quarry as if it might still fly away.  But here the nostalgic reminisces grind to a halt because I cannot for the life of me remember what we did with them next.  Even at the age of 10 when one’s barbaric tendencies are at a peak, the idea of pinning them to a board or glueing them into a macabre holiday craft montage  seemed a little, well, unnecessary. So instead I imagine they  sat on the kitchen table, shedding and gathering dust in equal measure, until swept to their ultimate doom by my mother in a fit of domestic zeal.

This week I discovered a far more humane way to reignite my brief flirtation with the world of lepidoptery; a cheap and cheerful craft punch, which has proven to have a multitude of uses.  I worked my way through some leftover gift wrap, then experimented with watercolours and finally some old walking maps, which my husband had unwittingly left lying around.  I am mildly apprehensive about the day when he confidently whips one open when lost on a Yorkshire moor and finds that there is a butterfly-shaped hole in the place where the footpath was once shown, but I’ll endeavour to not lose any sleep over it.  A word of advice on maps; if using the more mundane modern versions like me, rather than the romantic olde worlde versions, do check what map detail you are stamping out before attaching your butterfly irrevocably to a card; I had to prise a fluttering ‘Public Sewage Works’ butterfly off and start again…

Close-ups, tips and tools below.

A Kaleidoscope of Butterflies on pastel paper. If you had the time or inclination to keep going, these would look beautiful en masse in a box frame. (Fact of the day; a kaleidoscope is indeed the beautiful and apt collective noun for a group of butterflies…)

Map butterflies glued to a square of mount board with a watercolour wash

Fun layering with leftover gift wrap – this would work well on tags or headed notecards too

A wallpaper butterfly on mount board as before, this time with a dash of glitter glue

Materials:

  • Hobbycraft small butterfly punch (£3.99)
  • Decorative paper scraps and maps
  • Gel craft glue or hot glue (glue sticks like Pritt will work fine for flat butterflies but are not quite strong enough if you’re folding and mounting at an angle)


A kitchen for the Mini-Gourmand

It was when we were raising a glass to the completion of our new kitchen that we belatedly noticed Harry stalking around stroking the cupboards and muttering gleefully ‘My new kitchen! What is in my cupboards? I cook now!’

Never one to miss an opportunity to raise an enlightened metrosexual, it seemed an opportune time to focus on completing the toy play kitchen I’ve been making out of bits and bobs in the garage, but which has fallen off the priority list since our house move.

I bought a dresser top from Ebay (a bargain at £12) and painted it with leftover cream Eggshell, then raided the local Poundsaver store for accessories; the sink (lasagne dish), cups, utensils and bread board all cost less than £1, which is just as well as their life expectancy is already in jeopardy after some flamboyant, Heston-style dramatic gestures from the toddler chef de cuisine. The recycled taps and knobs were procured during a visit to the local dump after I wrestled them off an unwanted sink and cupboard, with the wrench and screwdriver I tend to carry in my handbag (ex-Girl Guides are always prepared…).

Harry may be a dab hand in the kitchen, but he is still inevitably a small boy, so guests; be warned that top of the menu is Slug Soup and Worm Sandwiches.  At least you know he’ll have pretended to wash his hands before dishing up…


The finished play kitchen, complete with accessories…and the original Ebay find (below)

The kettle and toaster were an Amazon.co.uk find

The hob (below) was made with CDs and silver-sprayed wooden knobs

The cupboards are filled with empty food packets and a junk store tea set, plus this rather fabulous toy cake stand from Grandma

I admit it; this was just a great excuse to buy and eat a whole camembert.

Hours of fun (and peace…)

More

A-List Baking

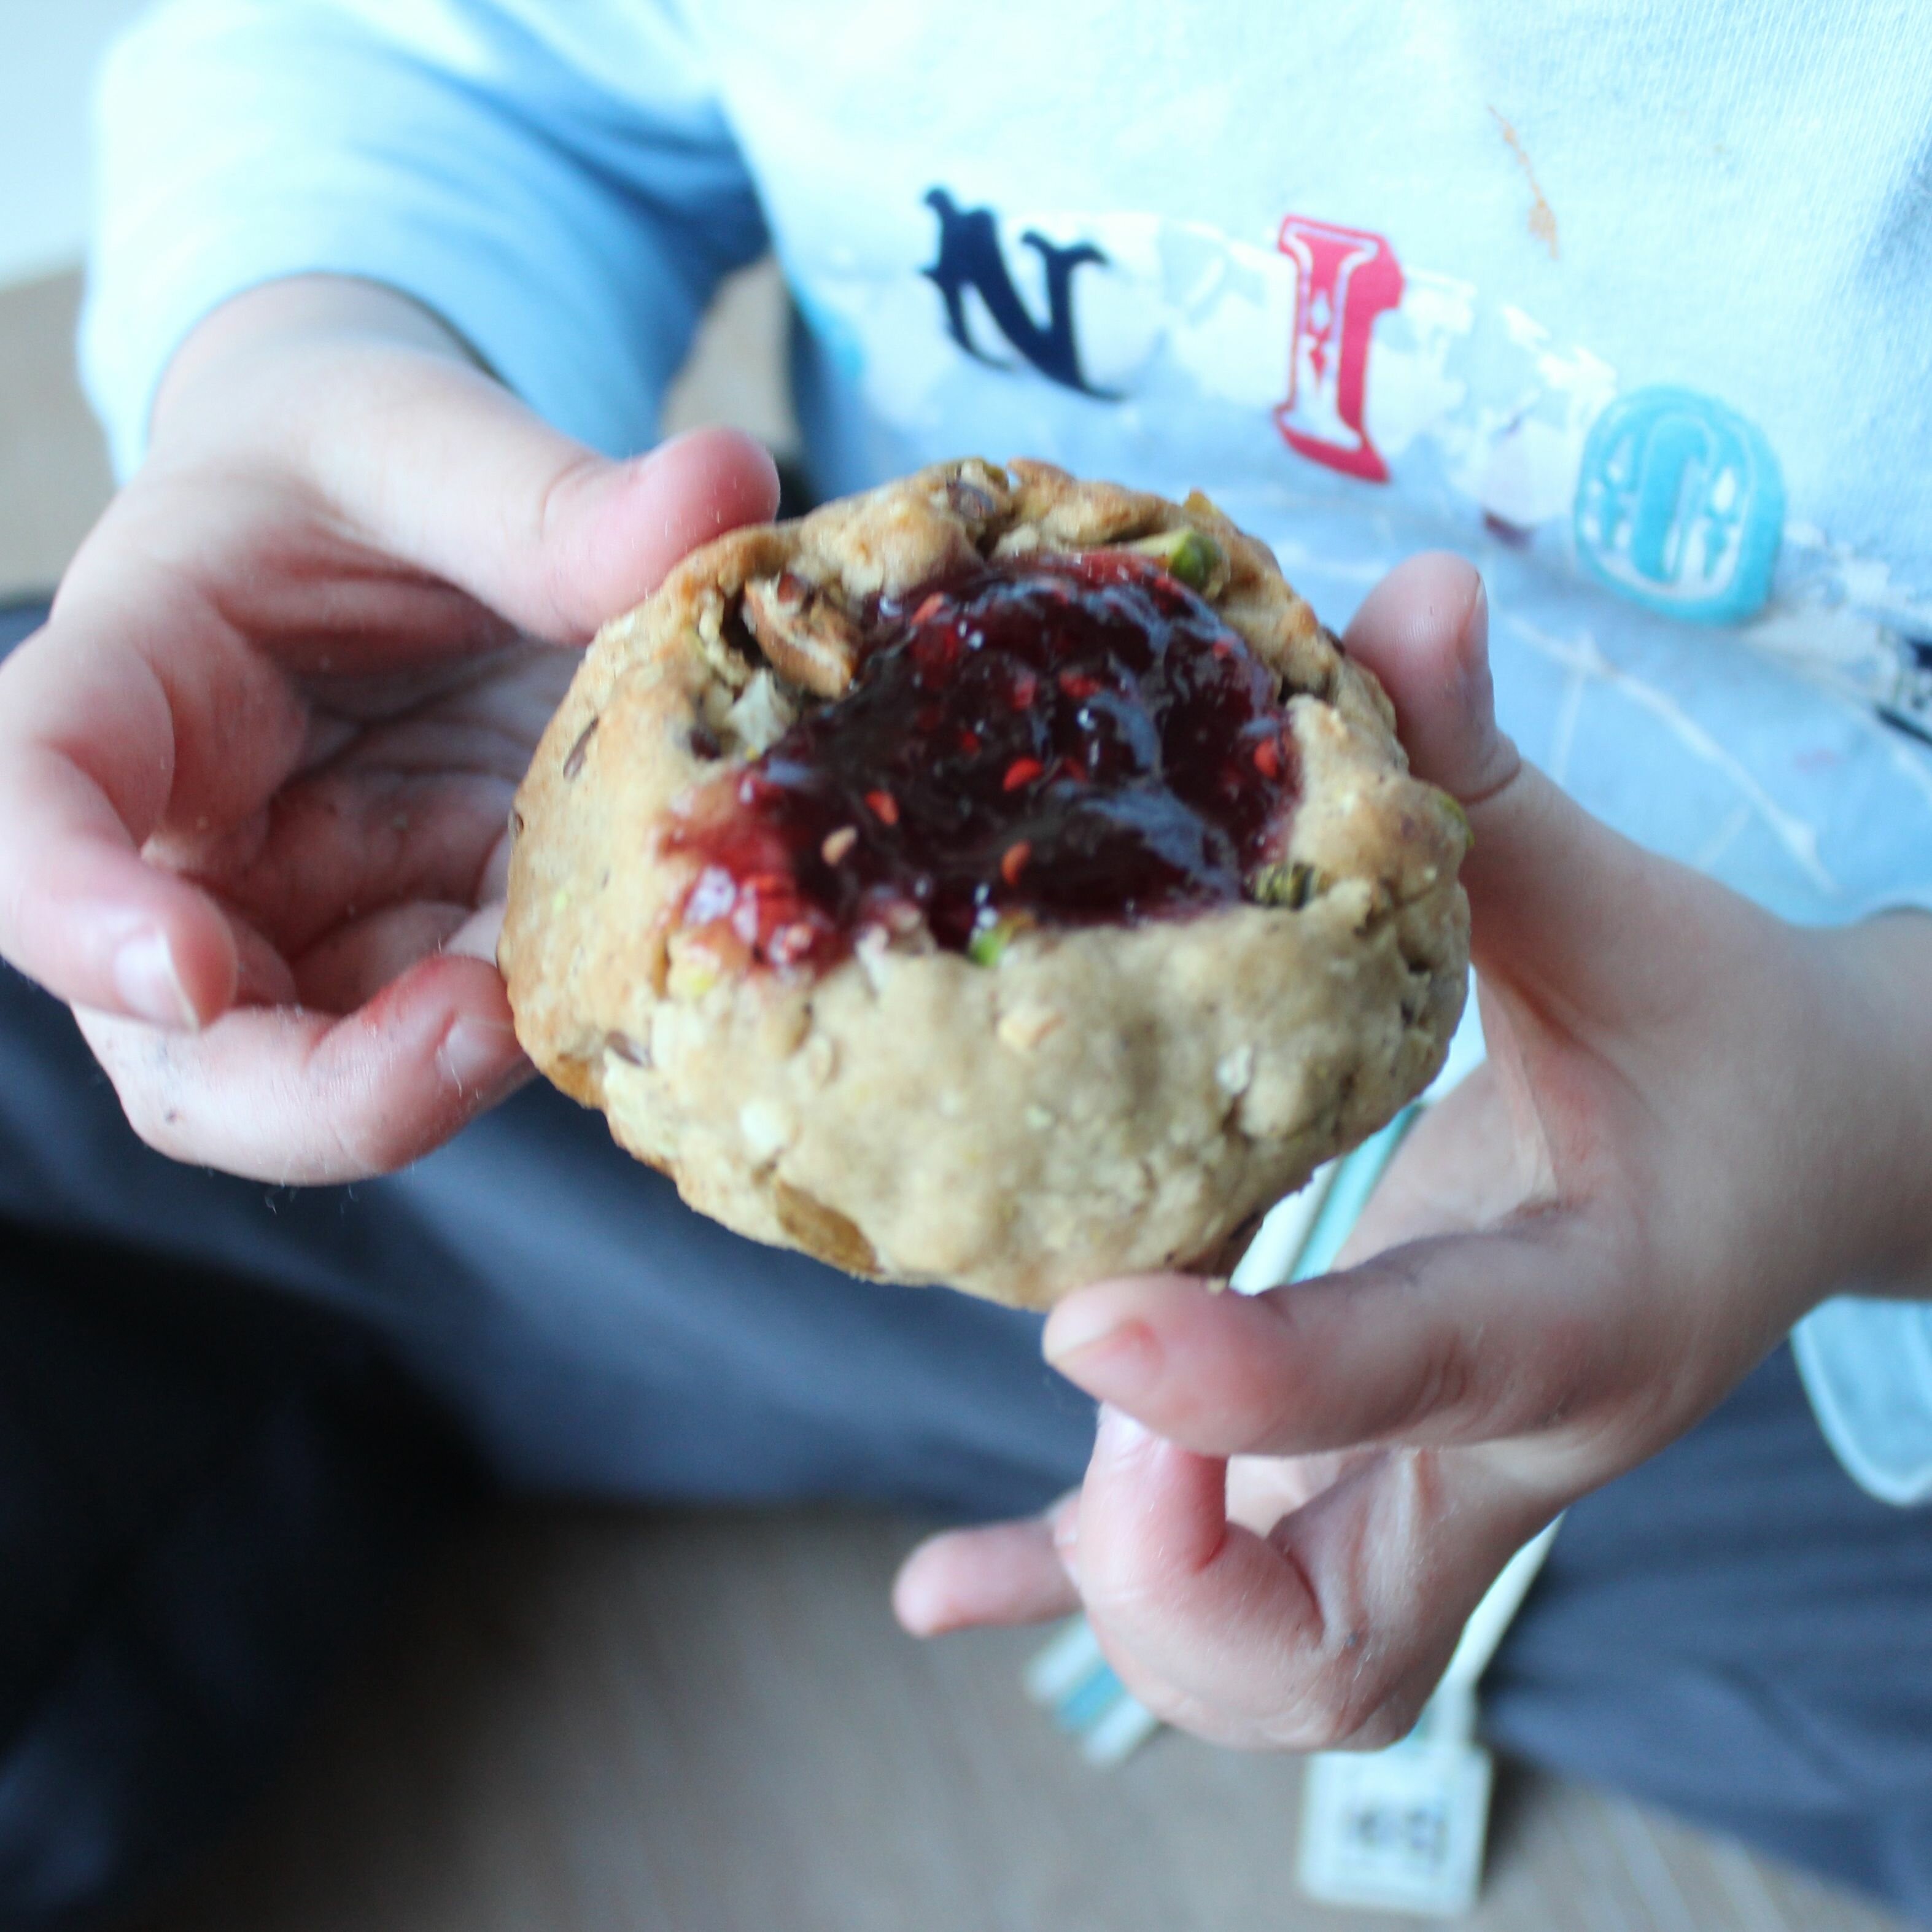
Say what you like about Gwyneth Paltrow, the girl’s obviously got buns of steel and thighs that could crack a walnut at 30 paces. Previously I have attributed this to a diet of pea shoots and a life frittered away in the gym, so I was delighted to discover that au contraire,she maintains her svelte physique by baking and snacking on jammy biscuits.  Well okay then, we’ll call them gluten-free thumbprint cookies.

Harry and I unashamedly customised her recipe in her recent book ‘My Father’s Daughter’, having been delighted to find something so suited to our natural kitchen style, namely a cookie that is actually supposed to be a greyish-brown colour when finished, and also to have a very dented and uneven appearance.  I must ‘fess up that here the similarities end, as Gwyneth confidently predicted a batch of ‘around 50′ cookies, and our efforts yielded, well, 12.  This portion control could explain many things.  Still, H and I will maintain our belief that a proper cookie is one of a size which requires both hands to get a good grip.

Recipe follows… they taste wickedly, addictively good.  Eat one and then give the rest away. Quickly.

Step One: Combine all of the ingredients except for the jam.  Roll into balls and place of a baking sheet.  Demonstrated here by my beautiful assistant Ted Glen, of Postman Pat fame.

Step 2: Make a thumbprint dent, then add a healthy dollop of jam in the centre of each

Step 3: Bake in the oven for 20 mins.  Use this time to either a) kill yourself on the treadmill in preparation for the carb onslaught or b) make a large pot of coffee and locate a comfy chair and a plate.

Step 4: Admire, consume, repeat.

Recipe:

4 cups of Barley flour

3 cups of chopped almonds (we used pistachio nuts instead – we love them)

1 cup of Maple syrup

1 cup of oil

Pinch of salt, teaspoon of ground cinnamon

Jam – any flavour you like.

adapted from Gwyneth’s Paltrow’s  ’Lalo’s Cookies’ recipe

MadHatter’s Cake Stand

I spent last Summer vaguely lusting after the gravity-defying cake stands which popped up in every style magazine and chic home store (Anthropolgie does this kind of thing beautifully).  I convinced myself that it was exactly the kind of thing I could knock up at home on a wet Sunday, using thriftily purchased remnants of china from the charity store, to eventual gasps of awe from anyone who came to tea.

In the event it’s taken me about 6 months to acquire enough cups and saucers, within my self-imposed budget of no more than a couple of pounds for each, not least because I eventually opted for white porcelain pieces… somehow there’s a fine line between uber-stylish retro chintz and just full on mis-matched, chipped 70′s china, and I definitely kept finding the latter. Colourful egg-cups from Pip Studio provided a little burst of zingy colour in the otherwise-white ensemble.

So here it is, the finished result, albeit with a distinct cake deficit in this shot; we are still recovering from the cupcake frenzy of last week, so it may be some time before I can picture this properly laden with sugary delights. n.b. For anyone who is similarly inspired and reaching for the hot glue, there’s a definite knack to cobbling one of these together; my ‘how to’ notes are below…

Materials and methods:

  • 3 or 4 plates of differing sizes; I used a saucer, side plate, dinner plate and an optional under plate to rest it on
  • Selection of cups, mugs or egg cups all with flat rims – pile them up before glueing to check for wobble; they should sit happily and steadily before you attach them
  • Epoxy resin

To make:

  1. Compose your cake stand and try a number of different combinations. Decide which direction you want any handles to point in, and ensure you have enough height to layer cakes or biscuits on each tier. Step back and look at it from different angles before making your final decision.
  2. Clean each piece thoroughly and ensure they are fully dry.  Rub a little fine sandpaper over the base and rim of each piece you will be glueing, to increase the hold.
  3. Mix the epoxy resin together and apply to each piece in turn, working from the bottom and allowing each piece to set before adding the next layer.  Take great care to centre each piece, both aesthetically and to minimise the risk of any wobble
  4. Allow to dry fully, then test each join by pulling gently – the last thing your grand hostess-y entrance needs is to be marred by the sudden loss of the bottom tier of your cake stand at the moment critique….
  5. I used a spray of orchid in the egg cup at the top, but depending on the occasion might also use easter eggs, coloured hat pins, berried twigs etc – or for a true Madhatter touch, twisted and bent cake forks and spoons (but there’s a whole other load of trips to the charity shop before I manage to acquire those).


Homemade Family Tree

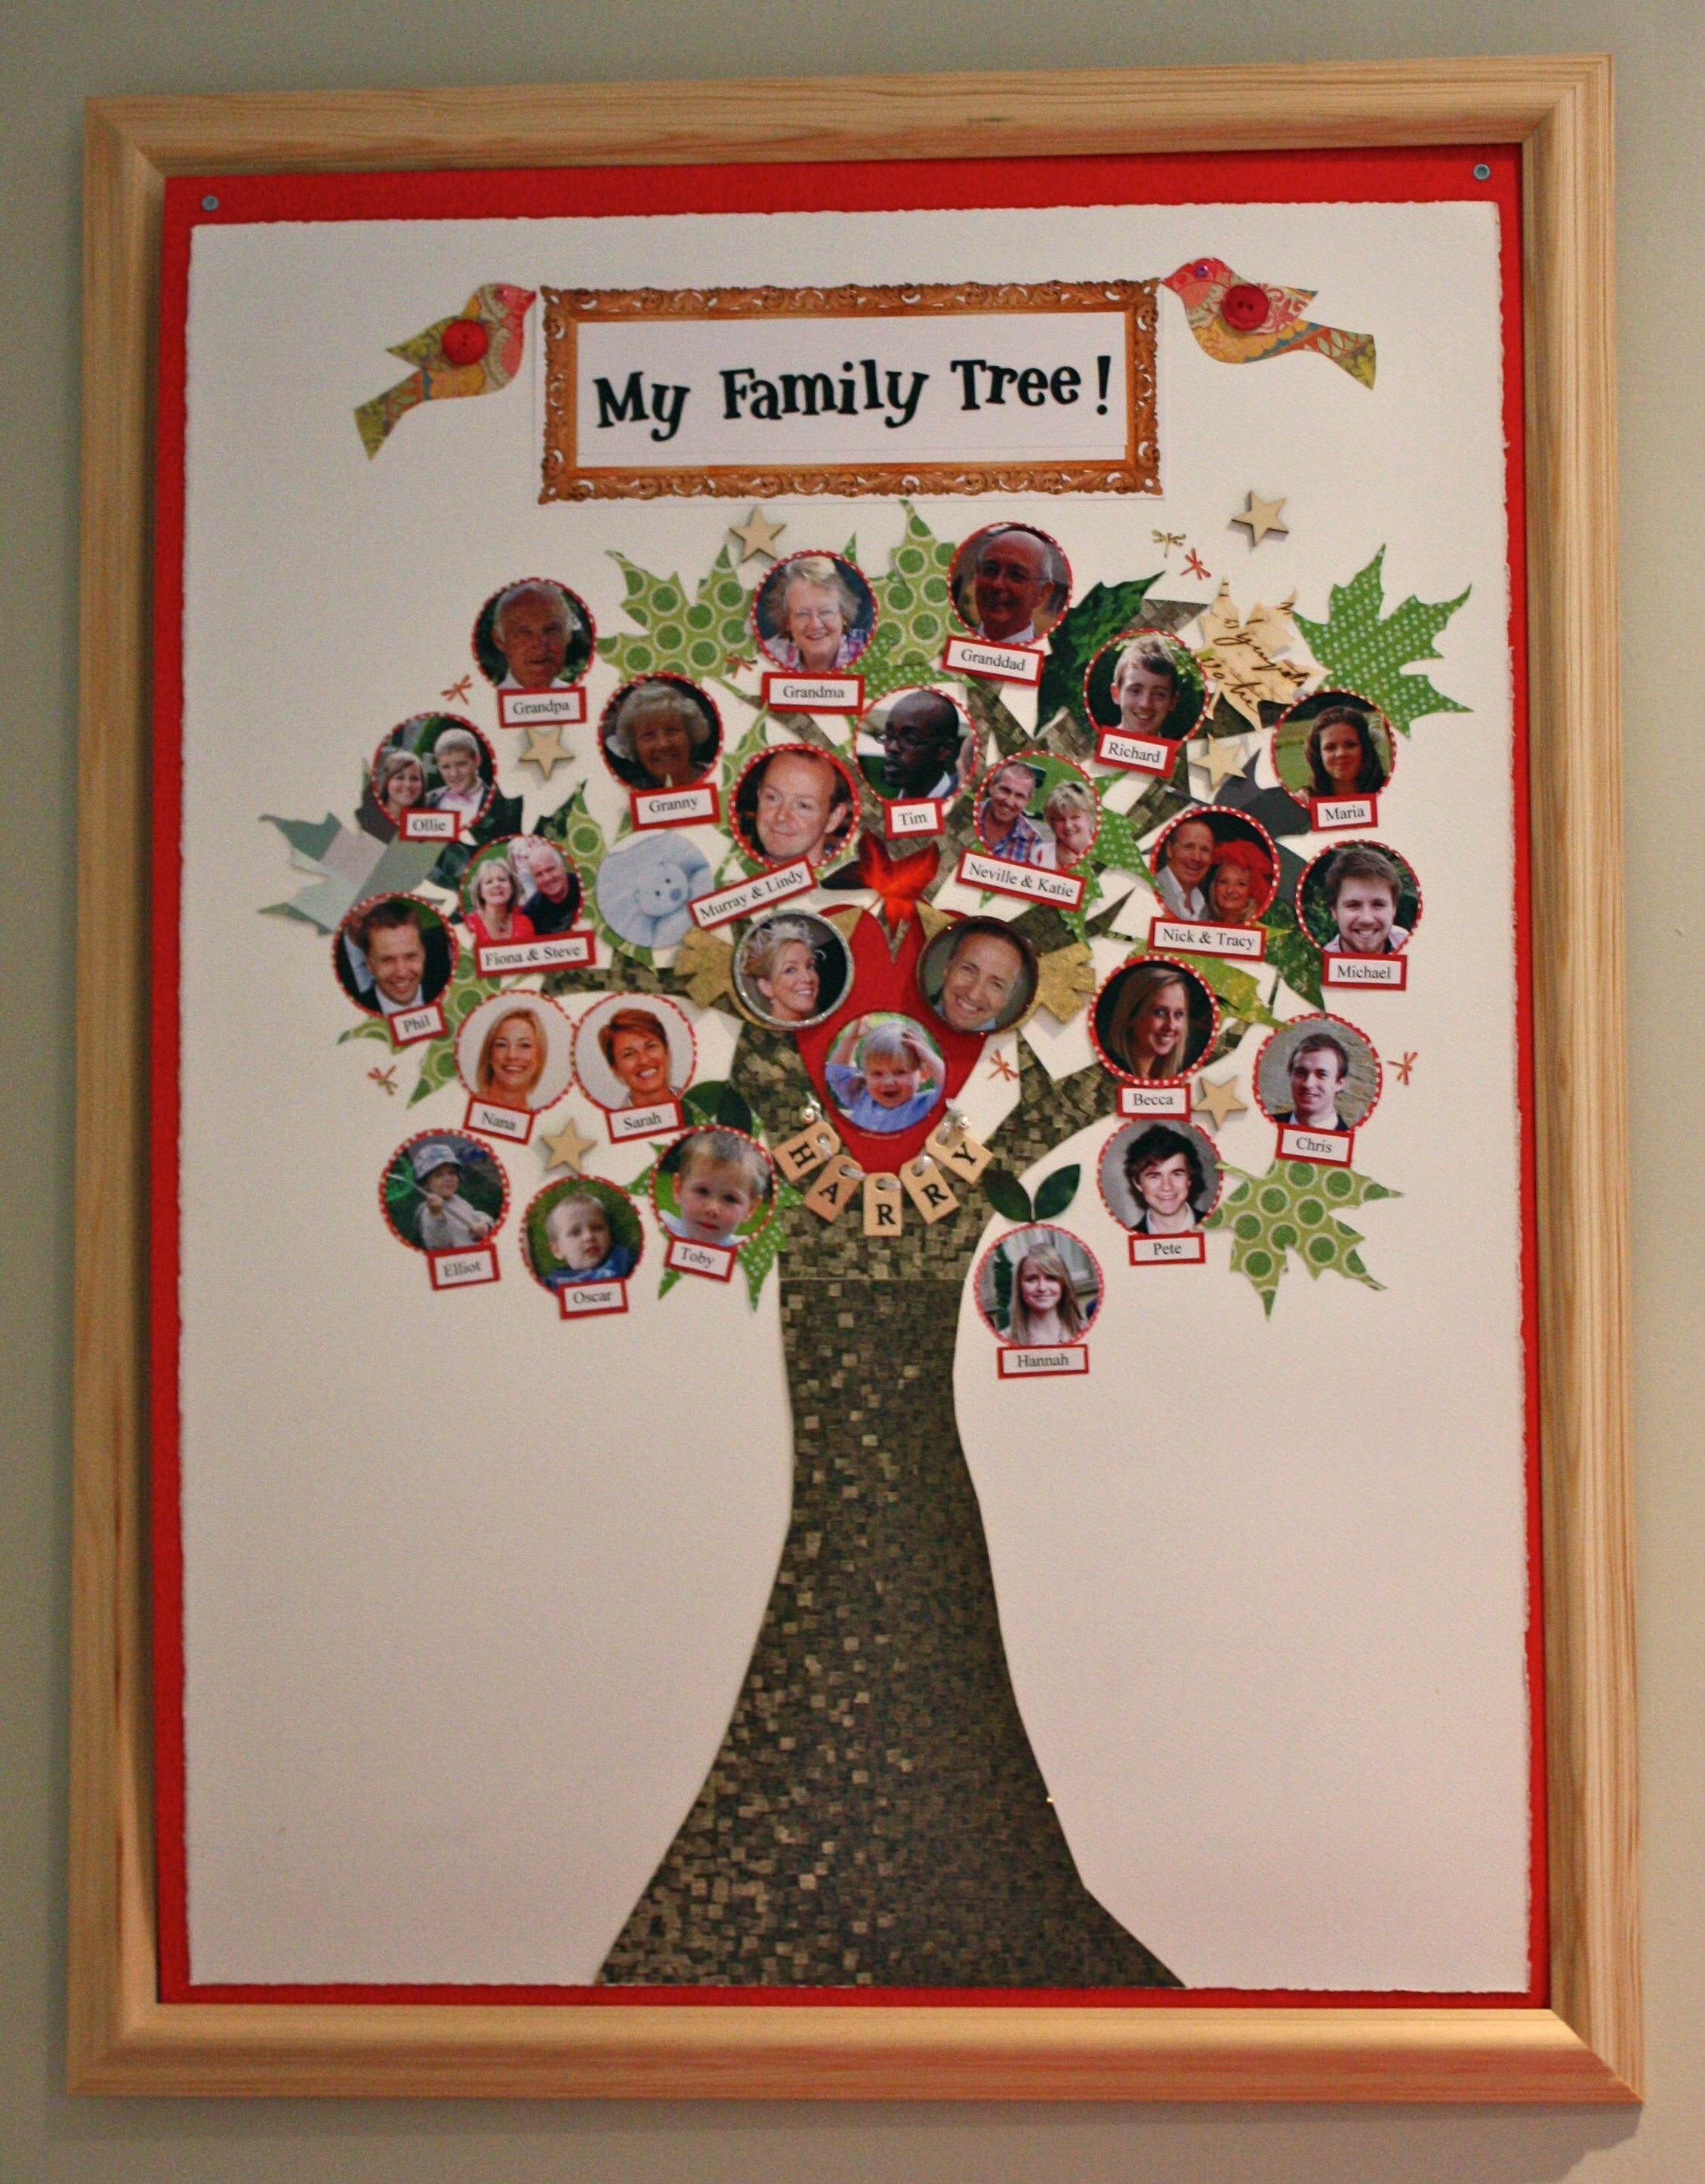
Your toddler years are probably the only time in your life where you are allowed – nay encouraged – to believe that you are the Centre of the Universe, around whom everyone else revolves.  Why not celebrate that with a scrapbook-style family tree? Harry is by now pretty clear on who his relatives are, but sometimes needs reminding.  He’s also fascinated by the connections between them and to him – particularly given that we’re a modern, blended family with all sorts of interconnectivities and the kind of complex histories that only a venn diagram could truly give order to.

We’re making this together (or rather, I make it with Harry issuing commands about who is placed where, wielding the glue stick and frequently peeling people off for a closer look, or to attempting to insert their photos into Postman Pat’s van, or attaching them to the fridge..so it’s hardly a zen, bonding crafting experience, it has to be said). We’ve taken a pretty liberal view of family, including favourite toys and friends as well as those from who Harry is genetically inseparable. It’s a work in progress as we collect photos to add in.  Be warned if you try this at home; EVERY single person who sees it will claim that you have used a terrible picture of them…